
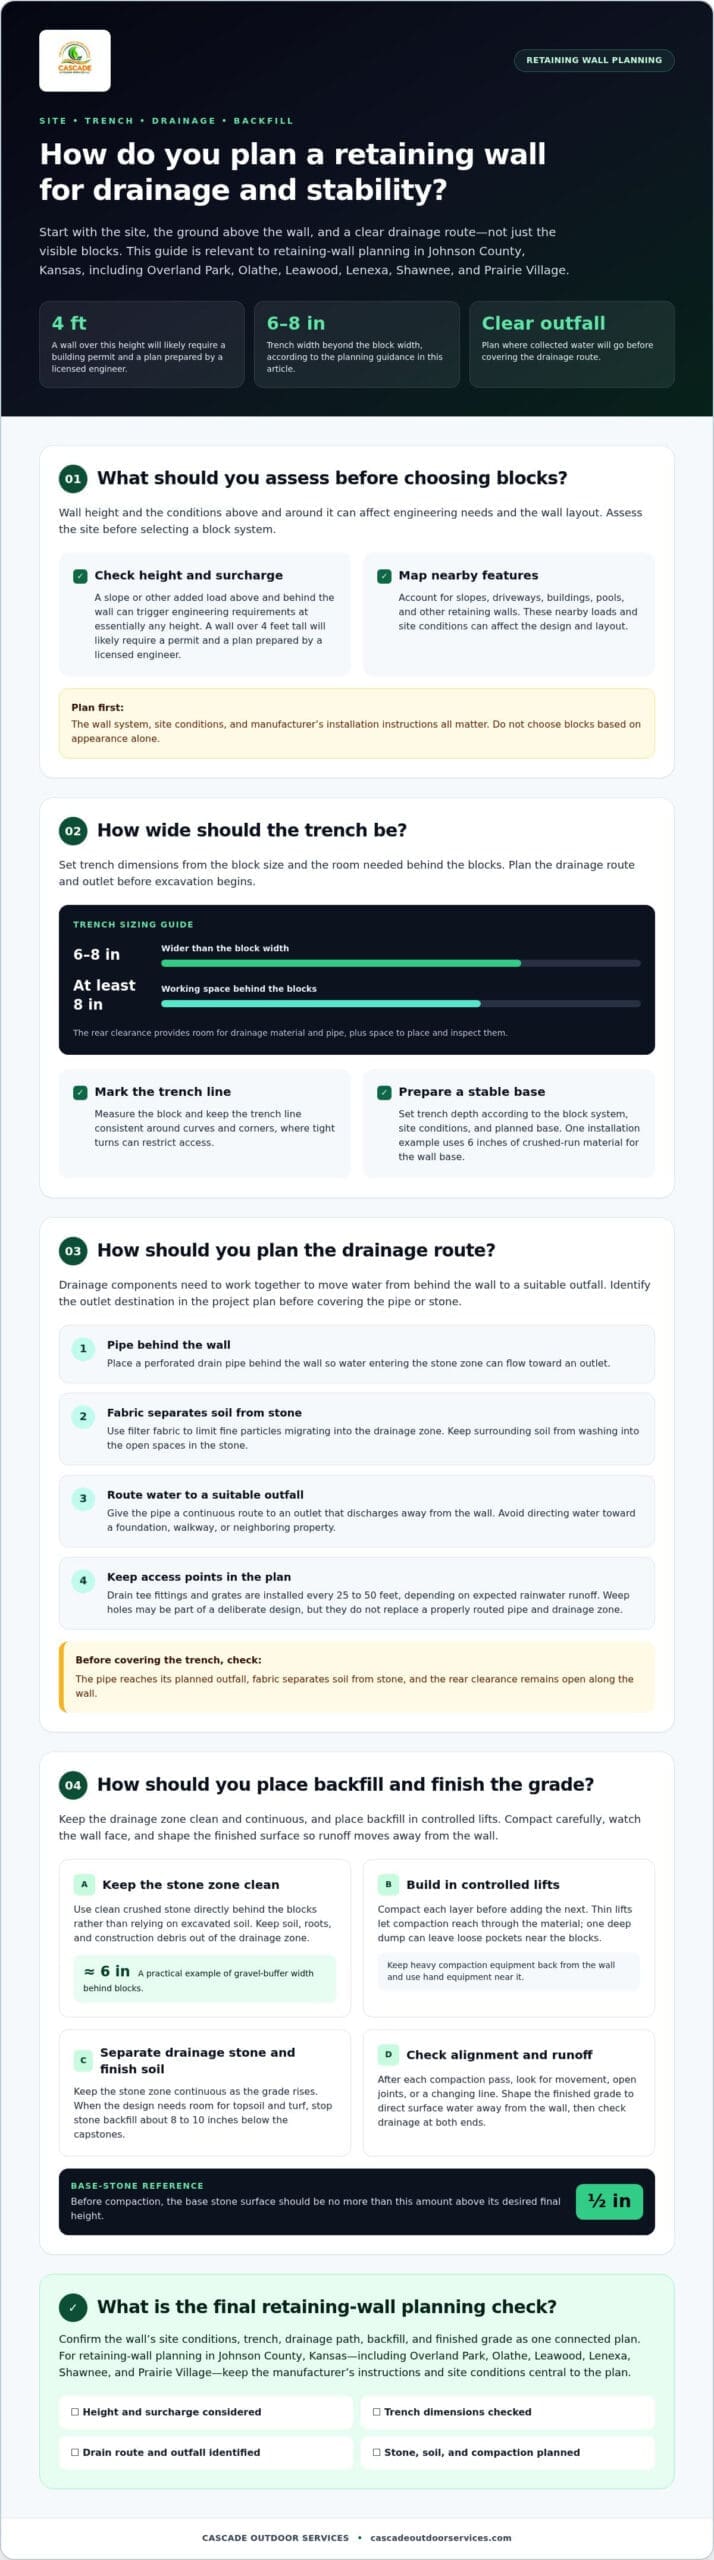
A retaining wall over 4 feet tall will likely require a building permit and a plan prepared by a licensed engineer. A slope or other surcharge above and behind the wall can trigger engineering requirements at essentially any height, so how to build a retaining wall that lasts starts with assessing the site, not choosing blocks. That matters whether you’re planning a project in Overland Park, Olathe, Leawood, Lenexa, Shawnee, or Prairie Village.
It’s easy to focus on a retaining wall’s visible face, but its base, drainage, and backfill do much of the work that keeps it stable. The right approach also depends on what sits above the wall, how water moves across the property, and the block manufacturer’s installation instructions.
This guide explains when to involve an engineer and how to plan the blocks, trench, excavation, backfill, and compaction. You’ll also learn why nearby slopes, driveways, structures, pools, and other walls can affect the design, so you can make informed decisions before digging begins.
Key Takeaways
- Assess wall height and the ground or structures above it early; a slope or other added load can affect the need for engineering even on a shorter wall.
- Plan the trench and drainage route together so water behind the wall has a clear path to a suitable outfall.
- Use appropriate backfill and compact it in controlled layers, keeping heavy compaction equipment away from the wall.
- Choose blocks for the site and follow the installation instructions supplied for that specific wall system.
- Account for nearby driveways, buildings, pools, and other retaining walls before deciding on the wall’s layout.
Backfill materials, lift thickness, and compaction
Backfill affects how water moves behind a wall and how firmly the finished grade supports the yard. Place stone in measured lifts, compact it carefully, and shape the surface to direct runoff away from the wall.
-
Which stone backfill should you select?
Choose clean crushed stone for the drainage zone directly behind the blocks, rather than relying on excavated soil. Stone leaves connected spaces for water to move toward the wall’s drainage system. Keep soil, roots, and construction debris out of this zone; mixed material can fill the spaces and slow drainage. A gravel buffer about 6 inches wide is one practical example used behind blocks.
-
How should you place and compact backfill lifts?
Add backfill in controlled lifts and compact each layer before placing the next. Thin lifts let compaction reach through the material, while one deep dump can leave loose pockets near the blocks. Crushed stone is described as almost 100 percent compacted as soon as it is laid, but the remaining backfill still needs careful placement. Keep heavy compaction equipment back from the wall and use hand equipment near it.
- Separate drainage stone from finish soil as you raise the grade. Keep the stone zone continuous behind the wall, and avoid filling it with clay or loose topsoil. One installation example uses 6 inches of crushed-run material for the wall base, then a separate gravel buffer behind the blocks. Those layers serve different purposes: the base supports the first course, while the rear stone helps water move downward.
- Stop stone backfill about 8 to 10 inches below the capstones when the design needs room for topsoil and turf. Then place soil above the drainage zone without pushing it into the stone. Shape the finished grade so surface water flows away from the wall, not toward its top edge. Check the slope with a straight board or level as you work, and correct low spots before planting or laying turf.
- Compact each lift without forcing the wall face out of alignment. After each pass, look along the blocks for movement, open joints, or a changing line. If the face shifts, stop adding material and correct the cause before continuing. A base stone surface should be no more than 1/2 inch higher than its desired final height before compaction, helping account for settling during the next construction step.
- Finish by checking drainage and grade at both ends of the wall. Backfill should connect with the planned outlet rather than trap water behind a closed section. Clear loose soil from the capstones, keep the topsoil separate from the stone, and inspect the surface after compaction. These checks help keep the drainage path open and runoff moving away from the structure.
How Wide Should a Retaining Wall Trench be?
A trench should leave at least 8 inches behind the blocks and extend 6 to 8 inches beyond the block width. Plan its drainage path before excavation, including where collected water will exit.
Retaining walls commonly fail when water pressure builds behind them or the base settles. Reduce these risks with a clear drainage route, stable trench preparation, and an outfall that carries water away.
- Measure the block and mark the trench before digging. Make it 6 to 8 inches wider than the block width, with at least 8 inches of working space behind the block. That rear space accommodates drainage material and pipe while leaving room to place and inspect them. Keep the trench line consistent around curves and corners, where tight turns can restrict access.
- Plan drainage before setting blocks. Place a perforated drain pipe behind the wall so water entering the stone zone can flow toward an outlet. Use filter fabric to separate surrounding soil from drainage stone and limit fine particles migrating into the drainage zone. Position the fabric and stone to help prevent soil from washing into open spaces.
- Give the pipe a continuous route to a visible, suitable outfall. The outlet should discharge away from the wall and avoid sending water toward a foundation, walkway, or neighboring property. Drain tee fittings and grates are installed every 25 feet to 50 feet, depending on expected rainwater runoff. Identify the outfall destination in the project plan, rather than leaving the pipe’s endpoint unclear.
- Use weep holes only as part of a deliberate drainage design. They let water pass through the wall face, but don’t replace a properly routed pipe and drainage zone. Keep each opening clear during construction, and ensure the design allows water to pass without washing soil through the face. The fabric, stone, pipe, and outlet must work together.
- Check the trench and drainage route before covering either one. Confirm the pipe reaches its planned outfall, fabric separates soil from stone, and the rear clearance remains open along the wall. A project plan should name where drain water goes. For properties with recurring runoff, grading and drainage planning can help coordinate the wall with the broader site.
The cost per square foot in the United States depends on wall height, materials, access, excavation, drainage, and site conditions; pricing is provided after a quote request. Water pressure, poor drainage, inadequate base preparation, and nearby loads can contribute to failure, so plan the outfall and trench carefully before construction.
How should you handle excavation, spoil removal, permits, and inspections?
Lay out the wall with stakes and string, then set trench depth according to the block system, site conditions, and planned base. Footing depth varies with region, frost line, wall application, and applicable code requirements.
-
What permits and inspections should you check?
Check local permit and inspection requirements before excavation, especially for a tall wall or a site with added loads. Walls more than 4 feet tall will likely require a building permit and a plan prepared by a licensed engineer. For walls taller than 3 feet, consult a builder, engineer, or professional, particularly when safety is a concern. Include the wall’s full height and site layout when describing the project.
- Before digging, mark the wall’s face, ends, corners, and planned height. Stretch string between stakes to make the alignment visible, then compare it with existing grades and nearby features. For a small wall, follow this sequence: mark the line, locate utilities, excavate, prepare the base, set blocks, and backfill. Review corners and direction changes before excavation so the trench follows the intended footprint.
-
How should you excavate to the planned trench dimensions?
Contact the underground utility locator service before breaking ground, then excavate to the dimensions required by the wall design. Leave 6 to 8 inches for base material beneath the blocks. One installation used a 12-inch-deep trench for blocks measuring 6 inches high, but that is an example, not a universal footing depth. Check trench depth at several points along the marked line.
- Shape the trench bottom carefully after machine excavation or hand shoveling. Either method can loosen the top layer of soil, creating a soft spot that may settle beneath the wall. Remove loose material and reach firm, undisturbed soil before placing base aggregate. If the trench bottom varies, correct low spots rather than building on an uneven foundation. Clear loose clods from the excavated surface.
-
How do you remove spoil and prepare the base?
Move excavated soil away from the trench edge so it cannot fall back in or block access. Separate reusable soil from unsuitable debris, and decide where excess material will go before excavation. Compact and level the base material, then check its elevation along the wall’s full length before setting the first course. Keep the trench accessible for inspection during preparation.
- Inspect the open trench before covering the base. Confirm that the alignment follows the stakes, the bottom is firm, and the prepared base matches the planned grade. If the site has a slope or another surcharge, include it in the design review. Added loads can affect engineering needs even at modest wall heights.
What should you consider about surcharge from slopes, driveways, structures, pools, and nearby walls?
Loads above or behind a retaining wall can affect its design, even when the wall is short. Local frost depth, soil conditions, the wall’s purpose, and property boundaries also shape excavation and placement decisions.
- Map the ground and nearby features before choosing a wall layout. Mark slopes, driveways, buildings, pools, and existing walls above or behind the proposed face. Each can add pressure or change how soil and water move. A flat lawn behind a wall creates different load conditions than a driveway or steep slope.
- Account for surcharge during design, not after excavation begins. A slope or other surcharge above and behind a wall can trigger engineering requirements at essentially any height. For example, a short wall below a steep bank still faces added soil pressure. Note the slope’s location and nearby loads when planning the wall.
- Distinguish landscape edging from walls that retain significant loads. A low border holding a planting bed serves a different purpose from a wall supporting a driveway, pool area, or structure. Visible height alone doesn’t show the full demand. Record what the wall supports and whether people, vehicles, or structures are above it.
- Consider engineering and permits early for taller walls. Walls more than 4 feet tall will likely require a building permit and a plan prepared by a licensed engineer. In jurisdictions using a four-foot threshold, height is commonly measured from the bottom of the footing to the top of the wall. A professional consultation is also recommended for walls taller than 3 feet, especially where safety is a concern.
- Factor local ground conditions into footing depth and base design. Frost depth, soil type, the wall’s application, and applicable code requirements can change the required excavation. Soil that holds water creates different drainage demands from well-draining ground. Property-line constraints also affect where the wall, excavation, and drainage outlet can fit, so mark boundaries before finalizing the alignment.
- Plan tiered walls as one site system rather than separate decorative features. A tiered retaining wall should be spaced so the upper tier is at least twice the height of the lower wall behind it. For instance, a 4-foot-tall lower wall calls for the upper wall to sit at least 8 feet behind it under this guidance. Slopes and added loads may still affect engineering needs.
- Choose the wall material and layout for the job, not just the appearance. Timber, segmental block, and natural stone create distinct finishes, but every design must account for retained soil, nearby loads, drainage, and site limits. Before construction, compare the planned wall height and surroundings with applicable permit and engineering requirements.
Choosing retaining-wall blocks
Choose a wall system based on the site, its loads, and the installation instructions for its specific blocks. The right choice balances structural demands with the finish you want for your yard.
- Match the block system to the wall’s purpose before comparing colors or textures. A garden edge has different demands from a wall supporting a slope or driveway. Consider height, soil conditions, water movement, and nearby loads together. Understanding how to build a retaining wall that lasts starts with choosing a system suited to the site.
- Read the instructions for the specific blocks before setting the first course. Check the recommended base, placement pattern, connections, and cap details. Don’t transfer a detail from another block style without checking compatibility. The instructions explain how the components work together and which installation methods apply to that system.
- Set the first course carefully because every row above follows its alignment. Level each block in both directions and keep its face flush with adjacent blocks. Lay a straightedge across several blocks to reveal a high edge or dip. Correct uneven placement before stacking, since small changes at the base can become more noticeable as the wall rises.
- Stagger each upper block so it sits centered over the joint between two blocks below. This running-bond arrangement avoids vertical joints lining up through successive courses. Check the pattern at corners and ends, where cuts or partial blocks can disrupt alignment. Follow the selected system’s instructions for these transitions instead of improvising a connection.
- Plan buried courses and grade transitions before building upward. One approach steps up a course after two full courses sit below grade. Treat this as a layout example, not a universal rule: the wall design and block instructions determine the finished layout. Map each step to keep exposed block heights consistent as the ground changes.
- Choose compatible capstones and check their overhang along straight runs and corners. A recommended capstone overhang is 1 to 1-1/2 inches. Keep the cap line even rather than allowing isolated pieces to project farther. A clean, consistent cap finishes the wall while preserving the intended alignment and appearance of the selected system.
- Inspect each course before adding another. Check its level, face alignment, joint staggering, and the connections required by the block system. Some installations use rebar through blocks, but that detail shouldn’t be applied automatically to every system. Use the connection method specified for the chosen blocks and site conditions.
- Coordinate block selection with grading and drainage before settling the design. Water management affects the wall layout, space behind the blocks, and outlet route. For homeowners learning how to build a retaining wall that lasts, matching the block system to the drainage plan is a key design decision. If the site needs coordinated water management, grading and drainage planning can be considered alongside the wall design.
Cascade Outdoor Services: Timber Retaining Walls
Cascade Outdoor Services can help plan a retaining wall when site conditions, drainage, or nearby loads make construction more involved. Its Retaining Walls service includes timber, segmental block, and natural stone options. French drains can also be incorporated to manage water around the project.
For a wall in Overland Park, Olathe, or another Johnson County community, consider professional help when the layout includes a slope, supports a driveway, or requires coordinated drainage. The right material and design depend on the wall’s purpose, site conditions, and intended finish.
Review retaining wall services to explore the available options, or contact Cascade Outdoor Services to discuss your project.
Plan the Next Step for Your Outdoor Space
A retaining wall can make a sloped yard more usable, define a garden, or create a cleaner transition between outdoor areas. When coordinating walls with surrounding hardscaping such as patios or walkways, looking at work from specialists like Bayside Pavers can offer helpful ideas for blending materials seamlessly. Before moving ahead, note what you want the finished space to do and how it should look beside your home. That gives the project a clear starting point, from practical needs to the appearance you want to live with.
If you’re planning how to build a retaining wall that lasts, consider how water and everyday use affect your property. Cascade Outdoor Services works with homeowners in Johnson County, including Overland Park, Olathe, Leawood, Lenexa, Shawnee, and Prairie Village. Share your project goals and request a free on-site estimate to discuss a suitable next step for your yard.
Contact Cascade Outdoor Services to start a conversation about your retaining-wall project. A well-planned outdoor space can bring lasting function and a more finished feel to your home.
Frequently Asked Questions
First: does it need an engineer?
Engineering depends on wall height, site conditions, and what the wall supports. A slope or other added load behind the wall can trigger engineering requirements at essentially any height. Walls more than 4 feet tall will likely need a building permit and a plan prepared by a licensed engineer. For walls taller than 3 feet, professional consultation is recommended, especially where safety is a concern.
What retaining wall height requires a building permit or engineer?
In jurisdictions using a four-foot threshold, height is commonly measured from the bottom of the footing to the top of the wall. Height isn’t the only consideration: a slope or other surcharge behind the wall can affect engineering needs at essentially any height. Check local requirements before construction.
How do you build a retaining wall with proper drainage and geogrid reinforcement?
Follow the wall system’s engineered design and installation instructions for geogrid placement, and coordinate reinforcement with drainage. Geogrid extends into retained soil as part of the wall system, but its placement and use depend on the design. Behind the blocks, use a drainage zone and perforated pipe routed to a suitable outfall. Plan the outlet before covering the pipe so water has a defined exit.
Which retaining wall materials last longest: concrete block, timber, stone, or poured concrete?
No single material lasts longest in every setting. Performance depends on design, construction, drainage, soil, and exposure. Segmental concrete blocks create a modular wall, timber provides a wood finish, natural stone offers a varied appearance, and poured concrete forms a continuous face. Compare site loads and water conditions alongside the look you want. A material choice can’t make up for a wall system unsuited to its location.
What type of backfill and drainage pipe should be used behind a retaining wall?
Use clean crushed stone in the drainage zone and connect a perforated drain pipe to a suitable outlet. Keep fine soil and debris out of the stone, since they can obstruct water movement. Plan the pipe route to discharge away from the wall and nearby structures, and keep the outlet accessible for inspection. Follow the wall system’s instructions for materials and installation details.