
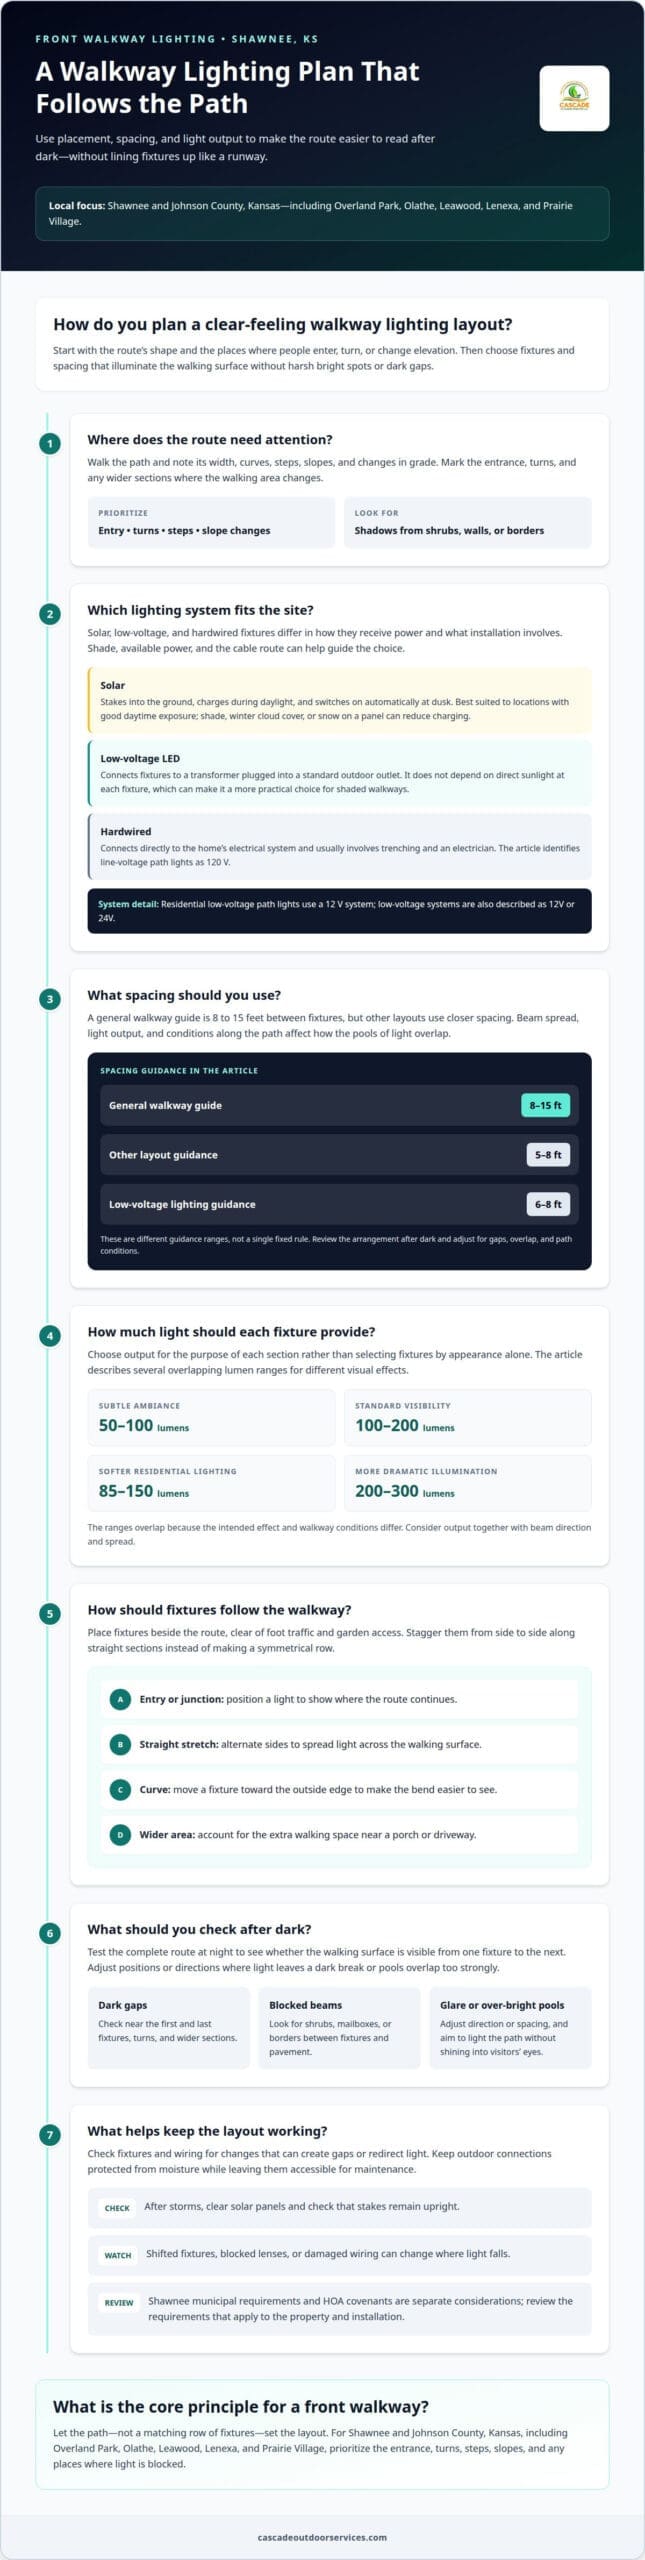
The safest-looking walkway lighting starts with thoughtful placement, not a row of matching fixtures. For path lights for a front walkway in Shawnee, KS, place lights near the entry, turns, steps, and changes in slope; a general spacing guide is 8 to 15 feet apart. Staggering them along the route helps illuminate the walking surface without creating a rigid, runway-like effect.
It’s easy to focus on how a fixture looks in daylight, but the real test is whether the walkway feels clear and comfortable to use after dark. The right layout depends on the path’s width and curves, nearby planting, and any steps or grade changes.
This guide covers common fixture placements, planning around slopes and steps, and what to consider when arranging installation and maintenance. It focuses on Shawnee and Johnson County, including Overland Park, Olathe, Leawood, Lenexa, and Prairie Village, to help you plan for a local property.
Key Takeaways
- Compare solar, low-voltage, and hardwired systems by considering the walkway’s layout, available power, and the kind of installation involved.
- Plan fixture spacing and brightness around the path’s length and visibility needs, rather than choosing lights by appearance alone.
- Give curves, steps, slopes, and grade changes focused illumination so the route is easier to read after dark.
- Understand how layout, fixture placement, and installation needs shape an estimate, and what routine upkeep can help maintain performance.
- Learn how a landscape lighting plan can bring path lights together with other outdoor fixtures for a cohesive entrance.
Are solar path lights a good choice?
Solar, low-voltage, and hardwired fixtures can all light a front walkway, but they work differently. Solar models stake into the ground, charge during daylight, and switch on automatically at dusk. Low-voltage LED systems connect fixtures to a transformer plugged into a standard outdoor outlet. Hardwired lights connect directly to a home’s electrical system and usually involve trenching and an electrician.
For a shaded walkway, low-voltage LEDs are often a more practical choice than solar because they don’t depend on direct sunlight at each fixture. Residential low-voltage path lights use a 12 V system; low-voltage systems are also described as 12V or 24V. Line-voltage path lights use 120 V. The choice affects how power reaches each fixture, the wiring layout, and installation needs.
Solar suits a path with good daytime exposure and a straightforward installation. Shade from a porch, mature tree, or north-facing wall can limit the light reaching a solar panel. Winter cloud cover or snow on a panel can also reduce charging, so output may vary. After Shawnee storms, check that panels are clear and stakes remain upright. Solar avoids connecting fixtures to household wiring, but each light relies on its own panel and battery.
Low-voltage systems use a transformer, cable, connectors, and fixtures. Plan the cable route before installation, connect compatible fixtures, and test the layout after dark. Brass connections are one option for outdoor wiring, provided they are compatible with the cable and fixture components. Protect connectors from moisture while keeping them accessible for maintenance.
Fixture styles affect both appearance and light distribution. A hooded path light directs light toward paving, while a taller bollard creates a more visible marker along an open walk. Aluminum, brass, and other metal finishes can complement stone, brick, or planted borders. Choose a design that lights the path without shining into visitors’ eyes.
Shawnee municipal requirements and HOA covenants are separate considerations, and applicable rules depend on the property and installation. Review local requirements and association documents when planning fixture placement, brightness, or wiring.
For a shaded route or consistent illumination, low-voltage LEDs are usually the stronger option; solar works best where panels receive daylight. Hardwired 120 V lighting may suit a plan that connects directly to household electrical service, with installation needs considered from the outset.
Where are path lights usually installed?
Install fixtures along the route, with particular attention to entrances, turns, and changes in direction. A plan for path lights for a front walkway in Shawnee, KS should consider both spacing and light output, so the walking surface is illuminated without harsh bright spots.
Spacing and Illumination Range
General walkway guidance places fixtures 8 to 15 feet apart, while other layouts use 5 to 8 feet or 6 to 8 feet for low-voltage lights. These ranges vary because output, beam spread, and path conditions affect how well pools of light overlap. Consider those factors together, then review the arrangement after dark.
Output shapes the visual effect. Subtle ambiance can use 50 to 100 lumens per fixture, while standard visibility commonly uses 100 to 200 lumens. Softer residential lighting may use 85 to 150 lumens, and 200 to 300 lumens creates more dramatic illumination. Choose output to suit each section instead of mixing fixtures without a clear purpose.
Consistent spacing helps maintain an even pattern along a long, straight stretch. A shaded section or one partly blocked by a wall may need closer placement to keep the pavement visible. Check each fixture’s beam direction and output, then see whether the light overlaps enough to avoid dark gaps.
Placement and Layout
Place fixtures beside the walkway, clear of foot traffic and garden access. Near an entrance or junction, position a light to show which way the route continues. Along a straight stretch, stagger fixtures from side to side instead of placing matching lights symmetrically. This creates a less rigid layout and spreads light across the path.
For example, place one fixture on the left side of a straight front walk, followed by another on the right. At a curve, move a fixture toward the outside edge to make the bend easier to see. Keep the layout aligned with the walking route instead of extending a straight row into planting beds.
Nearby features can block or redirect a beam. A shrub, mailbox, or low garden border may cast a shadow if it sits between a fixture and the pavement. Move the light to an open edge or adjust its direction. Where the walk widens near a porch or driveway, account for the extra walking area instead of automatically keeping the same spacing.
Review proposed positions along the entire route before installation. For path lights for a front walkway in Shawnee, KS, check for gaps near the first and last fixtures, turns, and wider sections. If beams leave a dark break, adjust the placement; if their pools overlap too strongly, change the spacing or direction. This keeps the layout consistent from the entrance to the destination.
How should pathway lights be placed around curves, slopes, steps, and grade changes?
Place lights where the pathway changes direction, elevation, or surface so the route remains easy to follow after dark. Common installation and maintenance problems include shifted fixtures, blocked lenses, and damaged wiring, each of which can create gaps or change where light falls.
On a curved walk, position fixtures to reveal the bend rather than line them up along a straight sightline. On a Shawnee slope, use different heights to highlight steps, retaining walls, trees, and grade changes. This layered placement helps distinguish the walking surface from nearby landscape features. A fixture near the top of a slope can show where the route continues, while another lower down can reveal the transition.
At low borders and walks, fixtures around 18-24 inches high can spread light across the route. Aim each beam toward the walking surface, not directly toward approaching visitors. At a step, place light where it reveals the tread edge and the transition to the next level; avoid relying on a fixture hidden behind a planter or wall. Check the view from both the approach and the landing.
Driveways and patios call for a different layout from a narrow front path. At a driveway entrance, lights can define where paving meets planting; beside a patio, they can mark the route between seating and the home. Keep decorative lighting secondary to the path’s direction so a feature does not obscure the route. A light near the patio edge can also show where the walking surface ends.
Residential pathway lighting often balances comfortable visibility with a subdued look around gardens and entrances. Commercial pathways may need a more continuous route between parking, building entrances, and shared outdoor spaces. In either setting, map the walking route first, then position fixtures at turns, transitions, and places where planting or architecture could block the beam.
For a decorative effect, combine low path fixtures with selective landscape lighting that highlights a tree trunk, stone edge, or architectural detail. Keep accent lights distinct from the fixtures that illuminate the path. For example, a tree near a curve can serve as a visual marker while a separate fixture lights the turn.
During installation, check the layout after dark and adjust fixture direction if light misses a step or spills onto a neighboring feature. For maintenance, clear leaves and mulch from lenses, reset tilted fixtures, and inspect visible wiring for damage. After a storm or garden work, walk the route and look for shifted lights, dark sections, or beams aimed away from the pavement. Check near walls for soil or mulch covering a fixture.
Repairs should address the cause, not just the visible symptom. A fixture that repeatedly leans may need more stable placement, while a dark section may result from an obstructed beam or wiring issue. Correcting the layout can preserve both the pathway’s decorative character and practical function. On sloped ground, also look for erosion that may have changed a fixture’s angle.
What should you expect from lighting estimates, installation, and maintenance?
A useful estimate starts with the pathway, nearby landscape, power source, and desired lighting effect. Installation planning should also account for fixture placement, wiring routes, and access for future maintenance.
How does residential landscape lighting installation work?
Landscape lighting can bring a walkway into a broader outdoor plan. For example, fixtures can connect the front path visually with a porch, backyard entrance, or planted border. The layout should show where lights will sit and how each beam illuminates the route without unnecessary spill toward neighboring homes.
Before installation, map the pathway and note steps, curves, planting beds, and existing electrical access. Plan fixture positions and wiring routes to avoid disrupting routine garden care. A nighttime review helps identify beams that need adjustment, dark patches, or glare in a window or seating area.
What should an estimate and maintenance plan cover?
An estimate should describe the proposed layout, fixture locations, power arrangement, and installation work. Project cost depends on the property and is provided after a quote request. Factors include the route’s length, the number and type of fixtures, wiring needs, and site conditions.
For routine maintenance, keep lenses clear and check that fixtures remain upright and aimed at the path. After landscape work or a storm, inspect visible wiring and look for lights shifted by soil movement, foot traffic, or equipment.
A practical installation sequence keeps the work focused on the property rather than treating each fixture separately:
- Plan the route. Mark the entrance, turns, steps, and destination, such as a porch or backyard gate.
- Set fixture positions. Account for plants, walls, and sightlines that may block or redirect light.
- Install and test. Connect the chosen system, then review its illumination after dark and adjust aiming where needed.
Each step informs the next. A path crossing a planting bed, for example, may need a different wiring route from one along a clear lawn edge. Keeping proposed positions visible during installation can help avoid interfering with the garden layout.
Light spill toward neighboring homes can be managed by adjusting fixture aim, shielding, beam angle, output, mounting position, and operating schedules when the system supports them. Directing a beam onto the walkway instead of outward helps limit unwanted spill. At a front entrance, review the final aim from the path, nearby windows, and outdoor seating.
Routine upkeep can reveal changes that affect performance. Clear leaves from a lens, reset a tilted fixture, and inspect exposed components after yard work. If one section goes dark, note whether the cause appears to be an obstructed fixture, shifted placement, or wiring concern. This can help guide a focused repair.
How can low-mounted fixtures light steps and wall edges?
Low-mounted fixtures can define step edges and retaining-wall borders without putting bright light at eye level. At a front entrance, warm LED light aimed downward can reveal each tread while keeping the fixture visually secondary to the surrounding stone, brick, or planting.
Fixture height should match the surface it needs to illuminate. Lights around 18-24 inches high can spread light across low borders and walks. At a short stairway, position a fixture beside the steps and direct its beam toward the tread surface; at a wall edge, aim it along the boundary so the change in level remains visible.
Choose each fixture for a clear purpose. A shielded path light can direct illumination onto paving, while a compact wall-mounted fixture can mark a stair or wall transition. Keep bright LED sources low and aimed downward, not toward someone approaching the entrance. This supports comfortable outdoor lighting while preserving the appearance of the space.
Recessed and in-ground fixtures offer a low-profile option where a standing fixture could interfere with a narrow walk or planting edge. Their placement needs careful coordination with the paving, wall, and wiring route. For example, a recessed light beside a landing can highlight a change in level, while an in-ground fixture along a stone border can mark the walkway edge. Keep the beam out of direct sightlines.
Match the electrical system to the installation plan. A low-voltage path system connects fixtures by wiring to a transformer, while hardwired lighting connects to the home’s electrical system. Fixture location, cable routing, and access for future maintenance all affect the layout. Avoid placing fixtures where edging, routine garden work, or foot traffic could repeatedly disturb them.
During an evening review, check the steps from the approach and from the top landing. Adjust a fixture if its beam misses a tread, creates glare, or leaves a dark gap beside the wall. After landscaping work, check for covered lenses, tilted fixtures, or disturbed wiring. These small changes can redirect light from where it is needed.
For a cohesive entry, coordinate low-mounted step lights with the surrounding path fixtures rather than treating the stairs as a separate feature. A consistent warm tone and downward direction can highlight stone edges while keeping the route visually clear. Explore landscape lighting services for an outdoor lighting plan that accounts for path, step, and wall-edge placement.
Cascade Outdoor Services: Landscape Lighting Installation (Uplights, Path Lights, Deck Lights)
Cascade Outdoor Services installs landscape lighting to help Shawnee homeowners make front walks, steps, and outdoor transitions easier to navigate after dark. Path lights can define a walkway, while uplights can highlight landscape features and deck lights can support outdoor living areas.
If a sloped entry meets a stone wall, lighting and structure can be planned together so fixtures suit the wall edge and walking route. Explore landscape lighting services to see how path lights fit within a coordinated outdoor plan.
For a front walkway project, share the route, steps, curves, and areas that are difficult to see at night. Cascade Outdoor Services can plan an installation around those site details. Contact Cascade Outdoor Services to discuss your Shawnee walkway lighting project.
Plan a welcoming, well-lit approach
A front walkway can shape the first impression of your home after sunset. Treat its lighting as part of the broader landscape, especially if future planting or changes to a sloped entrance may affect fixture placement. For path lights for a front walkway in Shawnee, KS, a site-specific plan can bring the entry route and surrounding outdoor spaces together.
Cascade Outdoor Services serves homeowners in Shawnee and across Johnson County, including Overland Park, Olathe, Leawood, Lenexa, and Prairie Village. If a walkway sits beside a grade change, consider the lighting plan alongside a Timber, Segmental Block, or Natural Stone Retaining Wall project. Coordinating these elements can help the path, wall, and surrounding landscape work together.
Ready to discuss your walkway and the look you want at your front entrance? Contact Cascade Outdoor Services to talk through a landscape lighting project. A thoughtful plan can make your outdoor space more inviting after dark.
Frequently Asked Questions
How bright should path lights be, and what color temperature is best?
For a front walkway, select brightness according to whether you want functional visibility or a softer accent. A common range is 100 to 200 lumens per fixture, while subtle effects can use 50 to 100 lumens. Warm-white light around 2700K to 3000K generally gives an inviting appearance; cooler options range from 4000K to 5000K. Keep the beam on the walking surface to avoid glare.
How do I know the number of path lights I need?
Choose fixture locations based on the walkway’s usable length, turns, steps, and changes in width, rather than appearance alone. Sketch the route and mark where someone needs to see the next direction or a change in surface. Then account for each fixture’s output and beam spread. A wide landing or shaded bend may need a different arrangement from a straight, open stretch.
How do you keep outdoor landscape lights from shining toward neighboring homes?
Aim each fixture at the feature it should illuminate, such as paving or a low wall, rather than toward a window. If a neighboring home is nearby, review the beam from the property line and the neighbor-facing side of the fixture. Shielding, beam angle, output, mounting position, and operating schedules can help control spill. Adjust the fixture after dark, when glare and unwanted light are easier to spot.
How far apart should path lights be spaced?
A general walkway guideline is 8 to 15 feet between fixtures, but the useful distance depends on output, beam spread, and obstructions. A low-output fixture may leave a gap if placed too far from the next light, while stronger overlapping beams can feel excessive. For a Shawnee entry with a bend or planting that blocks light, plan each section separately instead of applying one spacing pattern everywhere.
How much do walkway path lights cost in Shawnee, KS?
The total depends on the property and is provided after a quote request. Key factors include walkway length, fixture type and quantity, power source, wiring route, and site conditions such as paving or planting beds. A solar layout and a wired installation involve different components and work. For an estimate, describe the route, steps, and desired lighting effect so the project scope reflects the actual site.
Are solar or low-voltage path lights better for Kansas weather?
Low-voltage lights connect to a transformer plugged into an outdoor outlet, while solar fixtures charge in daylight. Solar output can be affected by shade, cloud cover, or snow limiting panel exposure. Consider whether proposed locations receive useful daylight and whether seasonal conditions may cover the panels. A low-voltage layout avoids relying on each fixture’s solar charging, but requires a suitable power source and planned wiring.
How far apart should path lights be spaced along a walkway?
For low-voltage path lights, a planning range is 6 to 8 feet, with fixture brightness affecting the final layout. Treat that as a starting point, not a fixed pattern for every property. A straight, unobstructed walk may distribute light differently from a route beside dense shrubs or a wall. Check the projected pools of light together, including near the first and last fixtures.
How do you install low-voltage path lights safely?
Plan the fixture locations and cable route before connecting the system. Residential low-voltage path lights use a 12-volt system and connect through a transformer plugged into a standard outdoor outlet. Use compatible components, keep wiring routed away from areas likely to be disturbed by digging, and test the finished layout. Hardwired path lights connect to household electrical service and usually require trenching and an electrician.