
Spring isn’t the only season to make progress on your landscape. Planning spring landscaping in fall in Prairie Village lets you use summer’s real-world lessons, such as which beds struggled in the heat, where water collects, and which areas need more coverage, to shape a thoughtful spring plan. For homeowners in Prairie Village and across Johnson County, Kansas, fall is a practical time to decide what to change before the growing season begins.
It makes sense to want a garden that looks good and suits local conditions without repeating last summer’s problems. Turn those observations into Kansas-friendly beds, a cohesive plant mix, suitable groundcover, and a mulch plan. Start by assessing your yard, then organize the project so spring work can focus on bringing the design to life.
Key Takeaways
- Use summer’s successes and trouble spots to decide what your spring landscape should keep, change, or solve.
- Match beds, trees, and shrubs to the site’s sunlight, soil, and drainage conditions.
- Build a cohesive planting plan by choosing a focused mix of native grasses and wildflowers with varied seasonal interest.
- Choose mulch, decorative rock, or groundcover based on how each bed should look and function.
- Plan mulch placement around beds and trees to support new plantings without piling it against stems or trunks.
1. How Can Summer Garden Experiences Guide Landscape Design?
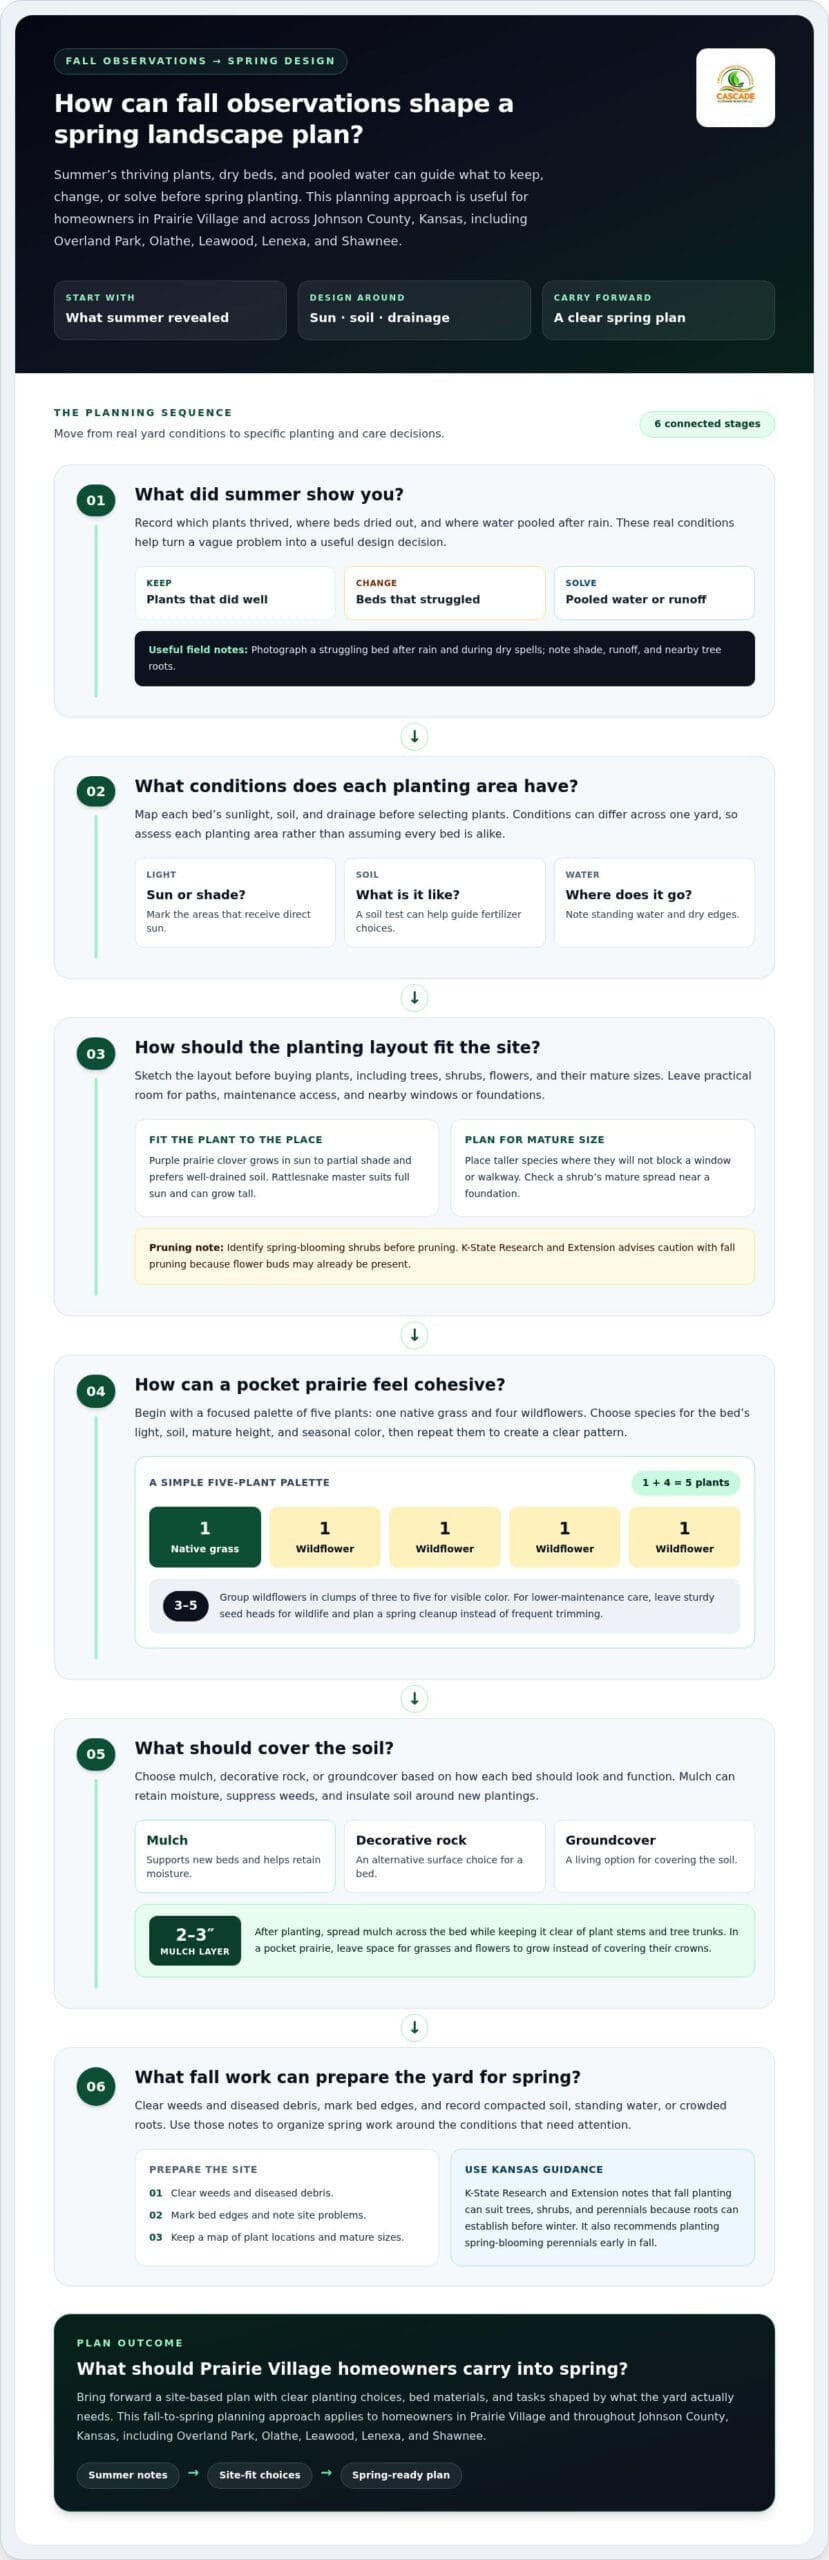
Use summer’s successes and problem spots to shape a spring landscape plan for Prairie Village. Record where plants thrived, where beds dried out, and where water pooled after rain.
How can homeowners find and compare Prairie Village landscaping contractors in fall? Compare written scopes, proposed plant lists, drainage plans, and project schedules so each proposal covers the same work. Ask how the design responds to conditions you observed, such as a wet corner or a flower bed that fades in afternoon sun.
What are Prairie Village’s rules for landscaping, tree removal, drainage, and permits? Requirements can depend on whether the work involves planting, removing a tree, changing drainage, or building a structure. Review current Prairie Village municipal guidance for the specific work before scheduling it, and distinguish routine planting from grading or tree removal.
What is the USDA hardiness zone and soil type in Prairie Village, Kansas? Use the current USDA Plant Hardiness Zone Map for the property’s location, then assess the soil in each planting area. Soil texture and drainage can differ across one yard, so a soil test and a small dug inspection offer more useful planting clues than assuming every bed is alike.
How should homeowners plan spring lawn seeding, sod, and irrigation in Prairie Village? First, map bare or thin lawn areas, check whether water drains toward the house, and note which zones receive reliable sprinkler coverage. Then match seed or sod plans to the site’s sun, soil, and watering access. K-State Research and Extension can guide timing for Kansas lawn work.
At summer’s end, walk the property after rain and during dry spells. Photograph a struggling hydrangea bed, a muddy path edge, or a sunny patch where flowers held their color. Note conditions beside each photo, including shade, runoff, and nearby tree roots. These observations turn “this bed never works” into a useful design decision.
A small prairie garden can start with a focused palette of five plants: one native grass and four wildflowers. Group wildflowers in clumps of three to five for visible color, and choose plants suited to the bed’s light and soil. For lower-maintenance care, leave sturdy seed heads for wildlife and plan a spring cleanup instead of frequent trimming.
Mulch supports new beds by retaining moisture, suppressing weeds, and insulating soil. After planting, spread a 2-3-inch layer across the bed, keeping material clear of plant stems and tree trunks. In a pocket prairie, leave space for grasses and flowers to grow instead of covering their crowns. A simple fall plan built from summer notes gives each spring task a clear purpose.
2. How Can Prairie Village Plan Kansas-Friendly Flower Beds, Trees, and Shrubs?
Build a spring planting plan around each bed’s sunlight, soil drainage, and mature plant size. In Prairie Village, sketch the layout before buying plants, marking trees, shrubs, and flowers that could compete for space.
Which landscaping tasks should be completed in fall to prepare for spring planting? Clear weeds and diseased debris, identify branches that need attention, and mark bed edges before spring growth begins. Also note compacted soil, standing water, and places where roots crowd the planting area so these conditions inform the project plan.
Choose plants for the site rather than trying to change the site for every plant. Purple prairie clover grows in sun to partial shade and prefers well-drained soil; rattlesnake master suits full sun and can grow tall. Place taller species where they won’t block a window or walkway. Near a foundation, check a shrub’s mature spread before deciding where to plant it.
Seasonal timing matters. According to K-State Research and Extension, fall planting can suit trees, shrubs, and perennials because roots can establish before winter. The organization also recommends planting spring-blooming perennials early in fall. Use the plant type and site conditions to determine whether a particular planting suits the season.
Inspect trees and shrubs before pruning. Look for broken limbs, dead wood, rubbing branches, and growth obstructing a path. Make selective cuts to remove damaged or crossing branches rather than shearing every shrub into the same shape. For a spring-blooming shrub, K-State Research and Extension advises caution with fall pruning, since flower buds may already be present.
Match pruning to the plant’s flowering pattern. A lilac, for example, may lose next season’s display if its buds are cut away during fall shaping. Identify the shrub first, then decide whether to remove damaged growth or wait until after flowering to prune. This preserves a natural form and avoids treating every plant in the bed alike.
Use soil testing to guide fertilizer choices. A test can identify nutrient needs and help prevent unnecessary applications to a tree or shrub that doesn’t need them. If fertilizer is called for, select it based on the test results. K-State Research and Extension generally favors slow-release or controlled-release fertilizer to reduce nutrient losses and support absorption.
Before spring planting, keep a simple map showing plant locations, mature sizes, and maintenance access. Leave room to reach a tree trunk without stepping through flowers, and avoid placing a large shrub where it will crowd a narrow path. These practical details help a new Prairie Village bed grow into its intended shape.
3. How Can You Choose a Limited Palette of Native Grasses and Wildflowers?
A cohesive pocket prairie can begin with five plants: one native grass and four wildflowers. Choose species for the bed’s sunlight, soil drainage, mature height, and seasonal color, then repeat them to create a clear pattern.
Start with the site, not a favorite flower. Mark the hours of direct sun, note where water lingers, and identify dry edges near pavement or tree roots. These conditions narrow plant choices and help each species establish in a suitable spot. In Prairie Village, a planting that reflects actual site conditions is easier to manage than a mix chosen only for appearance.
Keep the palette focused. A native grass gives the planting structure, while four flowering species add color and changing shapes. Select plants shorter than three feet for a more manageable design, especially beside sidewalks, windows, and front entries. Taller choices can still work at the back of a broad bed, where they won’t hide shorter flowers or interrupt a clear view.
Group each wildflower in clumps of three to five plants instead of scattering individual specimens across the bed. Repeating the same clump creates visual rhythm and makes gaps easier to spot as the garden fills in. Sketch the groups before planting: place the grass as a recurring anchor, then position flower clumps where their colors and heights can be seen from the house or path.
Plan for a succession of blooms rather than one brief display. Native alum root sends up small greenish blooms in late spring, while rattlesnake master’s bristled flowers attract adult pollinators through late summer. Aromatic aster adds fall color and provides flowers for insects preparing for winter or migrating south. Pairing different bloom periods gives a small Prairie Village bed interest across the growing season.
Include foliage and seed-head color in the design, too. Little bluestem shifts from blue and green to purple, then copper in late fall. That change adds texture after flower petals fade. Leave sturdy seed heads standing where they suit the design instead of cutting every plant back as soon as blooms finish.
Give the planting room to mature. Set grasses and wildflowers so their eventual shapes can meet without burying paths, edging, or neighboring plants. Visible soil between young plants is expected in a new garden; filling every opening with extra species can lead to crowding later. A focused palette makes it easier to see which plants thrive and which spots need adjustment.
Before winter, label the grass and flower groups on your sketch and keep a copy with the planting notes. Marking each species helps distinguish intended seedlings from weeds during spring growth. The result is a designed prairie bed with repeated forms, staggered blooms, and a manageable plant list.
4. Mulch, decorative rock, and groundcover
Choose bed cover based on plant needs, water flow, and how you use the outdoor space. Mulch suits many planted beds, decorative rock creates a durable surface, and living groundcover fills spaces with plants.
Start with the bed’s purpose. A narrow strip beside a walkway may benefit from rock that stays in place, while a perennial bed can use organic mulch. In either case, keep the material clear of plant crowns, stems, and tree trunks. This separation helps prevent buried growth and makes the bed easier to inspect.
Leaves can serve as winter cover, but thick mats may smother small plants. Rake fallen leaves from the lawn and move suitable leaves into beds as a loose protective layer. Avoid piling wet leaves over low-growing plants such as native alum root, whose small spring blooms need room to emerge.
Decorative rock works best where a clean, consistent surface supports the design, such as beside a path or around a feature. Before placing it, check how rain moves across the area. Rock won’t correct a low spot or redirect runoff on its own. A slope that carries water toward a foundation needs a drainage solution, not simply a different surface material.
Groundcover offers another option for open spaces between larger plants. Choose species that match the bed’s light and moisture, then leave enough room for them to spread without covering neighboring crowns. For example, use a low-growing plant near the front edge and taller prairie flowers farther back. This layered arrangement keeps paths visible and reduces bare patches as plants establish.
Consider upkeep before choosing materials. Organic mulch needs periodic attention as it breaks down, while rock can collect leaves and plant debris that require removal. A groundcover bed needs space to fill in and occasional weeding while young plants establish. Compare those tasks with the bed’s location, especially near a doorway or frequently used walk.
At the end of fall, inspect each bed for exposed roots, washed-out areas, and leaves covering small plants. Move loose material back into place, but don’t bury crowns or pack cover against trunks. K-State Research and Extension advises removing winter mulch in spring after freeze-thaw cycles have passed. That spring check also reveals where winter weather shifted rock or exposed soil.
Use a simple site sketch to record the material planned for each bed. Mark mulch around perennials, rock beside a path, and groundcover in open planting areas. Note drainage concerns separately so a surface treatment doesn’t hide a water problem. This map gives spring work a clear sequence and helps keep the finished landscape consistent across the yard.
5. Applying mulch around beds and trees
Apply mulch evenly over planting beds and tree root zones, without piling it against stems or trunks. For Prairie Village gardens, check the existing layer first so fresh material doesn’t build up too deeply.
Start by clearing weeds, fallen branches, and leaves that form dense, wet mats over perennials. Keep healthy leaves nearby if you plan to use them as winter cover. Rake the bed surface gently, taking care not to disturb shallow roots or crowns. If the soil is dry, water it before applying mulch so the layer helps retain existing moisture.
For a bed that needs a refresh, add about an inch of fresh mulch. Check the depth across the whole bed, not just near the edge, where material often gathers. Mulch should not exceed a three-inch depth. If the old layer remains thick, loosen or remove some before adding new material rather than covering it with another blanket.
Tree mulch should form a broad, even ring over the root area, with open space around the trunk. Pull material away from the bark instead of building a cone against it. A thick “mulch volcano” can keep bark damp and hide damage, while a flat layer protects soil without burying the trunk flare. Where practical, extend the ring outward instead of concentrating all the mulch beside the trunk.
New fall transplants need a different approach from established beds. Don’t add a heavy winter cover while the soil is still warm; wait until nighttime temperatures reach 32 degrees or lower and the soil just begins to freeze. Spread leaves, other spent plant material, or straw loosely over vulnerable plantings. After the soil has frozen hard, a good layer of straw can help limit thawing around plants and reduce frost-heave risk.
Check mulch after wind and rain. If runoff exposes roots on a slope, restore coverage without filling low areas or directing water toward the house. For a tree beside a walkway, keep the mulch ring clear of pavement so it doesn’t spill onto the walking surface. In a perennial bed, leave crowns visible and avoid pressing material tightly around stems.
Spring care matters, too. Remove winter mulch after freeze-thaw cycles have passed, as K-State Research and Extension advises. Pull it back gradually from emerging perennials, then assess the remaining layer before adding fresh material. A quick depth check helps prevent over-mulching and keeps beds ready for growing plants.
For a consistent bed finish across a Prairie Village property, plan where mulch belongs and which areas need another surface. Matching coverage to trees, perennials, and slopes keeps the landscape orderly while protecting planting areas through seasonal changes.
Cascade Outdoor Services: Timber Retaining Walls
Cascade Outdoor Services helps Prairie Village homeowners address retaining wall and drainage needs that affect a landscape plan. If a sloped bed needs structural support or water collects where spring planting is planned, consider the site layout alongside plant and mulch choices.
Options include timber, segmental block, and natural stone retaining walls, as well as French drains. These solutions suit different site conditions, so the slope, water movement, and surrounding landscape all matter when planning the work.
For a spring project in Prairie Village or elsewhere in Johnson County, Kansas, connect the wall or drainage plan to the intended beds and access paths. Explore grading and drainage services or contact Cascade Outdoor Services to discuss your landscape plans.
Put Your Prairie Village Landscape Plan in Motion
Planning spring landscaping in fall in Prairie Village gives you a head start on turning a design into a workable project. Use your yard observations to clarify what you want to change, then make sure planting areas, drainage, and any structural work fit together.
For a sloped bed or a landscape where water movement affects the layout, Cascade Outdoor Services installs timber, segmental block, and natural stone retaining walls. These options can address grade changes while supporting a coordinated outdoor design. The right plan starts with the property’s layout and the work you want the finished space to do.
As you plan next steps, keep your notes and site sketch together. They can help you explain priorities clearly and decide how the landscape should function as well as look. Cascade Outdoor Services serves Prairie Village and Johnson County, Kansas.
Contact Cascade Outdoor Services to discuss your landscape plans and take the next step toward a more considered spring project.
Frequently Asked Questions
Is It Better to Landscape in Fall or Spring?
Neither season is better for every landscape task; the project and plant type matter. Fall can suit trees and shrubs, while spring can work well for lawns and annual flowers. For example, Prairie Village homeowners replacing a thin lawn may plan seeding or sod for spring, while adding a tree may suit fall planting. K-State Research and Extension can guide timing for Kansas conditions.
What About Frost?
Frost can stop above-ground growth without immediately stopping root growth. Roots may continue growing until the soil freezes solid, so a frosty morning doesn’t automatically mean planting must stop. For a newly planted perennial, monitor soil moisture and exposure, especially if the site is windy or the soil drains quickly. Protect tender plants with suitable winter cover as conditions change.
When should Prairie Village homeowners plan spring landscaping in fall?
If you’re planning spring landscaping in fall in Prairie Village, start after summer reveals how the yard performs. Note areas that stayed soggy, plants that struggled, and views or paths you want to improve. Turn those observations into a planting map and decide which work depends on drainage, grading, or access. Early planning also gives you time to organize plant choices before spring work begins.
Which plants, trees, and shrubs are best for spring landscaping in Prairie Village, Kansas?
The right choices depend on the planting site’s sun, soil drainage, and available space. For a sunny, well-drained area, consider Kansas-friendly native plants such as purple prairie clover or little bluestem. In a partly shaded bed, select plants suited to lower light rather than expecting sun-loving species to thrive there. Check each plant’s mature size before placing it near a walkway or window.
What fall planting risks should Prairie Village homeowners consider, including frost and winter damage?
New plants can face drying soil, exposed roots, and frost heaving as winter conditions shift. A planting on a windy slope may dry faster than one sheltered by a fence, while poorly drained soil can leave roots sitting in excess water. Check that plants sit firmly in the soil, water when conditions are dry, and use winter cover appropriately as the soil begins freezing.
When should Prairie Village residents book landscaping contractors and order plants for spring?
When planning spring landscaping in fall in Prairie Village, organize contractor discussions and plant choices during fall. Advance planning can help you reserve preferred trees, shrubs, or flowers before spring stock sells out. Spring is a busy landscaping season, so leaving project details until later may push work further into the season. Prepare a clear scope, site photos, and a plant list to make scheduling discussions more useful.
What is the USDA hardiness zone and soil type in Prairie Village, Kansas?
Use the current USDA Plant Hardiness Zone Map for the property’s location. Assess soil in each planting area with a soil test and small dug inspection, since soil texture and drainage can vary across a yard.